Learning how to draw a bird flying can seem daunting, but this step-by-step guide breaks down the process into manageable, easy-to-follow steps. From understanding bird anatomy and gathering your tools to sketching basic shapes, refining details, and capturing dynamic wing movements, you’ll discover techniques to bring your avian art to life. Get ready to transform simple lines into majestic flying creatures with confidence and creativity.
How to Draw a Bird Flying?
There’s a unique magic in watching a bird soar through the sky. The effortless grace, the powerful beat of its wings, and the sheer freedom it embodies can be truly inspiring. For artists, capturing this dynamic motion on paper presents a fascinating challenge. You might have tried drawing a bird perched on a branch, but depicting one in full flight? That feels like a whole different ballgame, doesn’t it?
Many aspiring artists find themselves wondering, “How to draw a bird flying?” It seems complicated, with all those feathers, the complex wing structure, and the need to convey movement. But here’s the good news: it’s absolutely achievable! Just like learning to fly, it takes understanding the mechanics, breaking it down into simple steps, and a little bit of practice. This comprehensive guide is designed to take you on that artistic journey, transforming your initial hesitations into confident strokes.
We’ll dive into everything from the essential tools you’ll need to understanding basic avian anatomy in flight, building your bird from simple shapes, and then adding the intricate details that bring it to life. By the end of this article, you’ll have a solid foundation and the confidence to draw a bird flying that truly looks like it’s taking to the skies.
Key Takeaways
- Start with Basic Shapes: Simplify the bird’s body into an oval and use simple lines to map out the wings and tail before adding intricate details.
- Understand Avian Anatomy: Familiarize yourself with the basic structure of a bird’s body and wings, including primary and secondary feathers, to accurately depict flight.
- Utilize Reference Images: Always use clear photographs or videos of birds in various flight poses to guide your drawing and ensure realism.
- Capture Dynamic Movement: Pay attention to the different phases of flight—upstroke, downstroke, and gliding—and practice drawing wings in these distinct positions to convey motion.
- Layer Details Gradually: Begin with light, loose sketches, then progressively add details like feathers, eyes, and beak, refining your lines as you go.
- Practice Shading and Texture: Learn to use shading to create depth and volume, and experiment with different line strokes to suggest the soft texture of feathers.
- Embrace Imperfection and Practice: Drawing is a skill that improves with consistent practice; don’t be afraid to make mistakes and keep experimenting with new techniques.
Quick Answers to Common Questions
What materials do I need to start drawing a flying bird?
You’ll primarily need graphite pencils (HB, 2B, 4B), a good quality sketchbook or drawing paper, and erasers (kneaded and plastic). Reference photos or videos of birds in flight are also essential.
Should I start with outlines or shapes when drawing a flying bird?
Always start with basic shapes. Begin with a simple oval for the body, then add smaller shapes for the head and tail, and broad lines for the overall wing direction. This builds a strong foundation before adding details.
How do I make the bird look like it’s actually moving?
To convey movement, focus on dynamic wing poses. Depict wings in different phases of flight, such as the powerful downstroke (fully extended) or the folded upstroke. Using flowing lines and understanding foreshortening also helps.
What’s the easiest way to draw realistic feathers?
Instead of drawing individual feathers, focus on sketching feather groups like primaries, secondaries, and coverts. Use varied pencil strokes to suggest texture and direction, and rely on shading to create definition rather than outlining every single feather.
How can I improve my bird drawings quickly?
Consistent practice with good reference material is key. Observe real birds, study anatomy, and don’t be afraid to experiment with different poses and shading techniques. Regular, short drawing sessions are more effective than infrequent long ones.
📑 Table of Contents
- Essential Tools for Your Artistic Flight
- Understanding Avian Aerodynamics: The Science Behind the Art
- The Foundation: Building Your Bird with Basic Shapes
- Bringing it to Life: Refining Details and Feathers
- Capturing Motion: Dynamic Wing Poses
- Adding Depth and Realism: Shading, Texture, and Environment
- Conclusion: Your Artistic Journey Takes Flight
Essential Tools for Your Artistic Flight
Before you embark on your drawing adventure, it’s helpful to gather a few basic supplies. You don’t need anything fancy to get started, but having the right tools can make the process much smoother and more enjoyable.
Pencils for Precision and Shading
- Graphite Pencils: A good set of graphite pencils is your primary tool. Start with an HB pencil for general sketching and outlining. Move to a 2B for darker lines and initial shading, and a 4B or 6B for deeper shadows and richer tones.
- Mechanical Pencil: A mechanical pencil with fine lead can be excellent for adding delicate details, especially for eyes or fine feather lines.
Paper for Your Canvas
- Sketchbook: A standard sketchbook with good quality paper (around 60-80 lb or 90-120 gsm) is perfect for practice. The texture should be smooth enough for clean lines but with a slight tooth to hold graphite.
- Drawing Paper: For more finished pieces, consider heavier drawing paper (around 80-100 lb or 120-160 gsm).
Erasers for Correction and Highlights
- Kneaded Eraser: This soft, pliable eraser is fantastic for lifting graphite without smudging or damaging the paper. It’s also great for subtle highlights.
- Plastic Eraser: A traditional plastic eraser is useful for removing stronger lines and cleaning up edges.
Reference Materials: Your Flight Manual
- Photos and Videos: This is arguably the most crucial tool. Find clear, high-resolution photographs or even slow-motion videos of various birds in flight. Observe different species, wing positions, and flight patterns. Websites like Pixabay, Unsplash, or even YouTube are excellent resources.
- Observation: If possible, spend time outdoors observing real birds. Watch how their wings move, how they glide, and how their bodies are positioned.
Understanding Avian Aerodynamics: The Science Behind the Art
To truly learn how to draw a bird flying convincingly, you need a basic understanding of bird anatomy and how it relates to flight. You don’t need to be an ornithologist, but knowing the key components will significantly improve your drawings.
Visual guide about How to Draw a Bird Flying?
Image source: howtodrawforkids.com
Basic Bird Anatomy in Flight
- Body (Torso): The bird’s body is typically an aerodynamic, somewhat oval or torpedo shape. It’s the core from which everything else extends.
- Head: Proportionate to the body, with an eye and a beak. The head’s position often indicates direction and focus.
- Tail: The tail acts like a rudder, helping with steering and balance. Its shape and spread vary greatly between species and flight actions.
- Wings: These are the most complex and dynamic part. They consist of a bone structure similar to a human arm, covered with layers of feathers.
The Marvel of the Wing Structure
Bird wings aren’t just flat surfaces; they’re incredibly intricate. Focus on these main feather groups:
- Primary Feathers: These are the long, stiff feathers at the “hand” end of the wing, crucial for thrust.
- Secondary Feathers: Located along the “forearm” part of the wing, these provide lift.
- Coverts: Smaller feathers that cover the bases of the primary and secondary feathers, giving the wing a smooth, aerodynamic shape.
Understanding these groups will help you draw the wings with the correct form and texture, making your flying bird look realistic rather than just a shape with lines.
Phases of Flight: Capturing the Moment
Birds don’t just “fly”; they perform a series of actions. Observing these distinct phases will allow you to draw more dynamic and believable poses:
- Upstroke: As the wings move upwards, they often fold slightly to reduce air resistance. The primary feathers might separate slightly.
- Downstroke: This is the power stroke. Wings are fully extended, pushing down and back against the air, generating lift and thrust.
- Gliding: Wings are held outstretched, often slightly angled, allowing the bird to ride air currents with minimal effort.
- Take-off and Landing: These involve rapid, powerful wing beats and specific body postures.
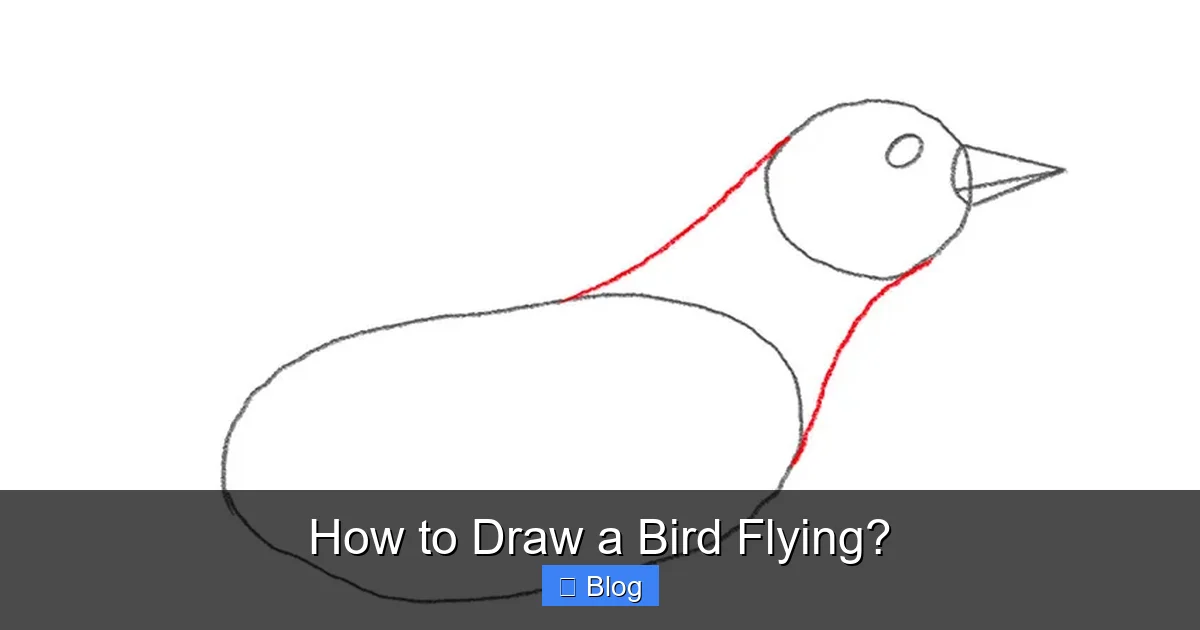
The Foundation: Building Your Bird with Basic Shapes
Now, let’s get to the actual drawing! The secret to how to draw a bird flying effectively is to start simple. Don’t immediately try to draw every feather. Instead, break the bird down into its most fundamental geometric forms.
Starting with the Body: The Central Oval
Begin by lightly sketching an oval for the bird’s main body. Think of it as an egg shape. This oval will establish the bird’s overall size and angle in your composition. Don’t press hard; these are just guide lines.
Adding the Head and Tail
- Head: Attach a smaller circle or oval to one end of the body oval for the head. Consider the bird’s perspective—is it looking straight ahead, up, or down?
- Tail: From the opposite end of the body, sketch a simple fan or wedge shape for the tail. Again, its angle will depend on the bird’s motion.
Mapping Out the Wings: Lines of Flight
This is where the magic begins. Instead of trying to draw the full wing shape immediately, use simple lines to define the wings’ direction and overall sweep.
- Central Line: From the top sides of the body oval, draw two sweeping lines outwards. These lines represent the general direction and curvature of the wings. Think about the upstroke, downstroke, or gliding position you want to portray.
- Overall Wing Shape: Around these central lines, loosely sketch the large, general shape of each wing. They might look like elongated teardrops or broad ellipses initially. Pay attention to how the wings connect to the body.
Tip: Sketch Lightly and Loosely!
At this stage, your lines should be very light—almost ghost-like. You’re building a skeleton, not carving in stone. This allows for easy corrections and adjustments as you refine the form. Don’t be afraid to draw through shapes; you’ll erase the unnecessary lines later.
Bringing it to Life: Refining Details and Feathers
Once you have the basic structure, it’s time to add more definition and start making your abstract shapes look like a real bird.
Defining the Head and Facial Features
- Beak: From the head circle, draw the beak. Its shape and size will depend on the bird species (e.g., long and slender, short and conical, hooked).
- Eye: Place the eye carefully. It’s usually a small circle or almond shape, often slightly above the beak. The eye adds character, so pay attention to its placement.
Fleshing Out the Body Contours
Smooth out the connection between the head, body, and tail. Refine the body’s oval shape, giving it more organic curves. Remember that birds are often very streamlined in flight.
Structuring the Wings: Feathers in Formation
Now, build on your basic wing shapes by adding the distinct feather groups:
- Primary Feathers: Sketch these as separate, somewhat pointed forms at the outer edge of the wing. They fan out slightly, especially on the downstroke.
- Secondary Feathers: These will form the broader, inner part of the wing, overlapping slightly.
- Coverts: Add a layer of smaller, softer-looking feathers over the “arm” portion of the wing, blending into the body.
- Tail Feathers: Define the individual feathers in the tail, considering their shape and how they overlap or fan out.
Tip: Focus on Feather Groups First
Don’t try to draw every single feather individually at this stage. Instead, focus on defining the *groups* of feathers. This gives the wing a realistic structure without getting bogged down in tiny details too soon.
Capturing Motion: Dynamic Wing Poses
The key to answering “How to draw a bird flying?” successfully is to convey movement. A static bird in the air simply looks like it’s frozen. Different wing positions communicate different actions.
The Upstroke: Preparing for Power
When drawing a bird on the upstroke, show the wings raised above the body, often slightly bent at the “wrist” and “elbow” joints. The primary feathers might be somewhat separated to allow air to pass through, reducing drag.
The Downstroke: The Moment of Thrust
For the powerful downstroke, depict the wings fully extended, sweeping downwards and slightly backward. This is when the wings push the most air, and the primary feathers are usually pressed together, creating a solid surface for maximum thrust.
Gliding: Effortless Soaring
A gliding bird will have its wings held out horizontally, often slightly arched, with minimal or no flapping. The body might be angled slightly to catch air currents. This pose conveys serene, effortless movement.
Practice Wing Arcs
Observe how a bird’s wings move in an arc during flight. Try sketching a series of wings in different positions along that arc to practice capturing the flow and rhythm of flight. This helps create a sense of continuity and motion.
Tip: Use Flowing Lines
When drawing wings, use long, flowing, confident lines rather than short, choppy ones. This helps convey the smooth, powerful movement of flight.
Adding Depth and Realism: Shading, Texture, and Environment
Once your bird has its form and motion, it’s time to bring it to life with shading and texture.
Understanding Light and Shadow
Decide where your light source is coming from. This will determine where the highlights and shadows fall on the bird’s body and wings. Shadows create depth and make the bird look three-dimensional rather than flat.
- Highlights: Areas directly facing the light source will be brightest.
- Mid-tones: The general color of the feathers.
- Shadows: Areas away from the light, such as the underside of the wings or body, will be darker. Use softer pencils (2B, 4B) for these areas.
Creating Feather Texture
You don’t need to draw every individual feather. Instead, use your pencil strokes to *suggest* texture:
- Smoothness: For covert feathers, use smooth, overlapping strokes.
- Stiffness: For primary and secondary feathers, use more defined, slightly separated strokes, especially towards the tips.
- Softness: Around the head and body, use very light, feathery strokes to indicate soft down.
- Blending: Use a blending stump, a tissue, or your finger (carefully!) to soften transitions between shadows and mid-tones.
Subtle Details that Make a Difference
- Eye Glint: A tiny highlight in the eye can make it look alive.
- Beak Texture: A few subtle lines can indicate the beak’s material.
- Shadows under the bird: If you’re drawing a sky background, a very subtle shadow cast on a cloud can add realism.
Suggesting an Environment
You don’t need to draw a detailed landscape. A few wisps of clouds, a hazy horizon line, or a subtle gradient in the sky can enhance the feeling of flight without distracting from the bird.
Tip: Practice Blending and Layering
Experiment with different pencil pressures and blending techniques. Layering light graphite strokes gradually builds up depth and tone, giving your bird a richer, more realistic appearance.
Conclusion: Your Artistic Journey Takes Flight
Congratulations! You’ve just learned how to draw a bird flying, from the foundational shapes to the intricate details that give it life and motion. Remember, drawing is a journey, not a destination. Each stroke is a step forward, and every sketch teaches you something new.
The most important takeaway is to keep practicing. Don’t be discouraged by drawings that don’t turn out exactly as you envisioned. Each attempt refines your eye, sharpens your hand, and deepens your understanding. Observe birds in the sky, study reference photos, and most importantly, enjoy the process of bringing these magnificent creatures to life on your paper. Your artistic wings are now ready to spread and soar!
Frequently Asked Questions
Is it necessary to know all bird anatomy to draw a flying bird?
While you don’t need to be an expert ornithologist, a basic understanding of key anatomical features like the structure of wings (primary and secondary feathers) and the bird’s body shape in flight is very helpful. This knowledge allows you to draw more accurately and convincingly.
What kind of birds are easiest to draw in flight for beginners?
For beginners, it’s often easiest to start with birds that have relatively simple, broad wing shapes and common flight patterns, like gulls, crows, or pigeons. Their clear wing movements in gliding or steady flight are good for observation.
How do I choose good reference photos for drawing a flying bird?
Look for high-resolution photos that clearly show the bird’s body and wing structure. Ideally, find images that capture different phases of flight (upstroke, downstroke, gliding) and various angles. Videos, especially slow-motion ones, can also be incredibly useful.
What’s the importance of light sketching in the initial stages?
Light sketching is crucial because it allows you to easily make adjustments and corrections without leaving deep indentations on your paper. It helps you build the form gradually and ensures you establish the correct proportions and pose before committing to darker lines.
Should I add a background when I’m just learning to draw a flying bird?
Initially, focus solely on the bird itself. Once you’re comfortable with the bird, you can add a simple, suggested background like a gradient sky or a few abstract clouds. Avoid detailed backgrounds that might distract from your main subject or become overwhelming.
How can I convey different bird species when drawing them flying?
Pay attention to the unique characteristics of each species: wing shape (e.g., long and slender for swifts, broad for eagles), tail shape, body proportions, and typical flight posture. Even subtle differences in head or beak shape can distinguish one species from another in flight.