Embark on an exciting artistic journey and learn how to draw a bird step by step! This comprehensive guide breaks down the process into simple, manageable stages, from sketching basic shapes to adding intricate feather details. You’ll discover essential tools, master fundamental avian anatomy, and gain practical tips to bring your feathered friends to life on paper, fostering your creativity and observational skills with every stroke.
Have you ever watched a bird flitting through the trees or perched on a wire, and wished you could capture that delicate beauty on paper? Maybe you’ve tried to draw a bird before, only to feel frustrated when it didn’t quite look right. You’re not alone! Drawing birds can seem intimidating at first, with all their intricate feathers, dynamic poses, and unique characteristics. But guess what? It’s much simpler than you think when you approach it in easy, manageable steps.
Imagine the satisfaction of seeing your own beautiful bird illustration come to life, feather by feather, right before your eyes. Whether you’re a complete beginner or someone looking to brush up on their drawing skills, this guide is designed for you. We’re going to break down how to draw a bird step by step, using simple shapes, clear instructions, and plenty of friendly tips. By the end of this article, you’ll have the confidence and knowledge to draw a variety of feathered friends, ready to take flight from your sketchbook!
So, grab your pencils and paper, find a comfy spot, and let’s embark on this exciting artistic journey together. We’ll start with the basics, build up to details, and soon you’ll be creating your very own avian masterpieces. Let’s learn how to draw a bird step by step, making the process fun, rewarding, and totally achievable!
Key Takeaways
- Start with Basic Shapes: Simplify the bird’s form into simple circles, ovals, and triangles to establish correct proportions and pose before adding details.
- Observe and Reference: Always use reference photos or observe real birds to understand their unique anatomy, feather patterns, and natural poses.
- Sketch Lightly First: Begin with very light, loose lines to build the foundation of your bird, making it easy to erase and refine your drawing.
- Layer Details Gradually: Work from large forms to small details, gradually adding wings, tail, legs, facial features, and finally feather textures.
- Patience and Practice are Key: Drawing birds takes time and consistent effort. Don’t get discouraged by initial attempts; regular practice leads to significant improvement.
- Embrace Imperfection: Mistakes are part of the learning process. View them as opportunities to learn and refine your technique rather than failures.
- Focus on Unique Features: Pay attention to the specific characteristics of the bird species you’re drawing – beak shape, eye placement, and tail length all contribute to its identity.
Quick Answers to Common Questions
What are the absolute essential tools I need to start drawing birds?
You only need a few basics: an HB pencil for general sketching, a lighter H-grade pencil (like 2H) for initial outlines, a good eraser, drawing paper or a sketchbook, and clear reference photos of birds.
Should I start with a specific type of bird, or does it matter?
It’s often easiest to start with a common bird with a relatively simple shape, like a robin or a sparrow, as their forms are quite straightforward. Once you grasp the basics, you can challenge yourself with more complex species.
How do I make the feathers look realistic without drawing every single one?
Focus on suggesting texture rather than drawing individual feathers. Use groups of short, overlapping strokes in the direction of feather growth, vary your line pressure, and add subtle shading to indicate feather layers and softness.
What if my bird drawing looks wonky or disproportionate?
That’s completely normal, especially when starting out! Go back to your reference photo. Compare your drawing’s basic shapes and proportions (head size, body length, tail length) to the reference. Lightly erase and adjust until the overall form looks correct before adding details.
How long does it typically take to get good at drawing birds?
There’s no set timeline; it varies for everyone. Consistent practice is key. With regular effort and patience, you’ll likely see significant improvement in your bird drawings within a few weeks or months. The journey of artistic improvement is continuous!
📑 Table of Contents
Gathering Your Tools and Cultivating the Right Mindset
Before we dive into the actual drawing, let’s make sure you have everything you need and are in the right frame of mind. Having the proper tools can make a big difference, and a positive, patient attitude is absolutely essential for learning any new skill, especially drawing.
Essential Drawing Supplies
You don’t need a professional art studio to learn how to draw a bird step by step. Here’s a simple list of what you’ll find most useful:
- Pencils: A few pencils with different lead hardness are great. An HB pencil is a good all-rounder for general sketching. A 2H or 4H pencil is fantastic for very light initial sketches, as it leaves faint lines that are easy to erase. A 2B or 4B pencil is ideal for darker lines and shading.
- Paper: Any plain white drawing paper will do to start. A sketchbook is perfect because it keeps all your practice in one place.
- Eraser: A good quality kneaded eraser or a plastic eraser will be your best friend. They help you clean up mistakes without damaging the paper.
- Reference Photos: This is crucial! Unless you have a live bird model (which is unlikely and very difficult to keep still), high-quality reference photos are invaluable. Look for clear images of the bird species you want to draw, ideally from multiple angles.
That’s it! You don’t need anything fancy to get started on your journey to learn how to draw a bird step by step.
Cultivating Patience and Observation
Drawing is as much about seeing as it is about putting lines on paper. When learning how to draw a bird step by step, taking the time to truly observe your reference material is vital. Look at the overall shape, the angle of the head, the curve of the back, the way the wings fold, and the intricate patterns of the feathers. Don’t rush! Art is not a race. Allow yourself to enjoy the process of discovery and creation. Every artist, no matter their skill level, started somewhere. Embrace the learning curve, and be kind to yourself as you practice.
Understanding Basic Bird Anatomy and Shapes
The secret to drawing complex subjects like birds isn’t to draw every feather right away. It’s to break them down into simple, manageable shapes. Think of it like building with LEGOs – you start with big blocks and then add smaller, more detailed pieces. This foundational understanding is key to truly learning how to draw a bird step by step.
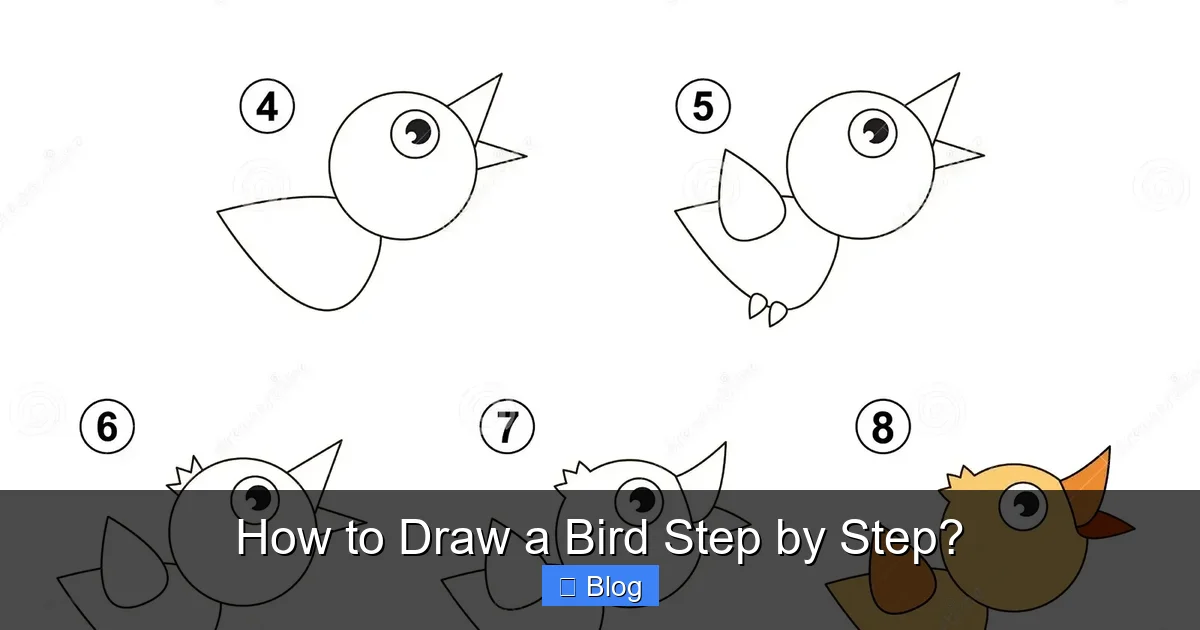
Visual guide about How to Draw a Bird Step by Step?
Image source: simpleeasydrawing.com
The Core Shapes: Head, Body, Tail
Almost any bird can be simplified into a few basic geometric forms:
- The Body: Often an oval or a slightly elongated egg shape. This will be the largest part of your bird.
- The Head: Usually a circle or a smaller oval, attached to one end of the body.
- The Tail: Often represented by a triangle or a trapezoid, extending from the other end of the body.
By first sketching these basic shapes, you establish the bird’s overall pose, proportions, and balance. This is the very first and most important step in learning how to draw a bird step by step correctly.
Proportions and Placement
Once you have your basic shapes, pay close attention to their relative sizes and how they connect. Is the head large or small compared to the body? Is the tail long and fanned out, or short and stubby? The angle at which the head connects to the body, and the body transitions into the tail, will define the bird’s unique posture. Use your reference photo constantly to check these proportions. For example, a robin has a rounder body and a relatively short tail, while a magpie has a slender body and a very long tail. Getting these basic proportions right early on will make your bird drawings look much more convincing.
The Step-by-Step Drawing Process – From Skeleton to Skin
Now that we understand the foundational principles, let’s get down to the actual drawing! We’ll go through the process of how to draw a bird step by step, building it up layer by layer.
Step 1: Light Sketching – The Foundation
Start with your lightest pencil (2H or 4H) and sketch very, very lightly. These are just construction lines. Don’t press hard; these lines are meant to be easily erased or drawn over.
- Draw the Body: Begin by drawing a large oval or egg shape for the bird’s main body. Don’t worry about perfection; just get the general size and angle right.
- Add the Head: Draw a smaller circle or oval for the head, positioning it correctly relative to the body. Consider the angle – is the bird looking straight ahead, down, or up? Connect the head to the body with a short, curved line for the neck.
- Sketch the Tail: Lightly draw a triangle or trapezoid shape for the tail, extending from the back of the body. Again, observe its length and angle from your reference.
- Establish the Center Line: A very faint line running through the center of the bird’s body can help ensure symmetry and guide the placement of wings and other features later.
At this stage, your drawing should look like a simple, almost abstract collection of shapes. This is perfectly normal and a crucial part of learning how to draw a bird step by step.
Step 2: Refining the Body and Head
Now, let’s start giving our bird some form. Use slightly firmer lines (HB pencil) to refine the contours. Think about the smooth curves of the bird’s chest, back, and belly.
- Connect the Shapes: Gently smooth out the connections between the head, neck, and body. Birds don’t have sharp angles; their bodies flow gracefully. Look at how the neck curves into the chest and back.
- Shape the Head: Refine the head shape, thinking about the specific species you’re drawing. Is the head rounder or more elongated?
- Indicate Wing Placement: Lightly sketch a rough outline of where the folded wings will sit on the bird’s back. Don’t draw the individual feathers yet, just the overall shape.
Step 3: Adding Wings and Tail
This is where your bird really starts to take shape! Wings and tails are defining features of any bird.
- Wings: Birds’ wings, when folded, often follow the curve of their back. Lightly draw the outer shape of the folded wing, remembering that the primary feathers at the tip of the wing are usually longer and more distinct. If the bird is in flight, observe the specific angle and spread of the wings in your reference.
- Tail Feathers: Refine the tail shape. Most birds have a set of long, stiff tail feathers that fan out. Observe how these feathers overlap and their overall length and shape for your specific bird. A common mistake when learning how to draw a bird step by step is to make the tail too stiff; give it some natural curve.
Step 4: Drawing Legs and Feet
Bird legs and feet might seem small, but they are incredibly important for balance and character.
- Legs: Birds’ legs are often slender. Sketch two parallel lines for each leg, paying attention to the angle. Birds usually have a “knee” joint that is tucked up into their body, so you typically only see the lower leg.
- Feet (Talons): Birds typically have four toes, three pointing forward and one pointing backward (anisodactyl arrangement). Observe how the toes grip the branch or ground in your reference. Draw simple, bent lines for the toes first, then add the small claws at the tips. Keep them delicate and proportional to the rest of the bird.
Step 5: Focusing on Facial Features (Eyes, Beak)
These small details give your bird its personality and make it recognizable.
- Eyes: The eye is a very expressive part of the bird. Draw a small circle for the eye, making sure it’s placed correctly on the head. Most birds have eyes on the sides of their heads, giving them a wide field of vision. A tiny highlight in the eye can bring it to life.
- Beak: The beak is another key identifying feature. Some birds have short, conical beaks for cracking seeds (like finches), others have long, pointed beaks for probing (like hummingbirds), or strong, hooked beaks for tearing meat (like raptors). Draw the upper and lower mandibles, paying attention to their shape, length, and how they meet.
By now, you should have a clear outline of your bird! You’re making excellent progress on how to draw a bird step by step!
Bringing Your Bird to Life – Details & Textures
With the basic structure in place, it’s time to add the captivating details that transform your outline into a vibrant depiction of a bird.
Feather Textures and Overlap
Feathers are what make a bird a bird! Instead of drawing every single feather, focus on conveying the *impression* of feathers. Different feather groups have different textures:
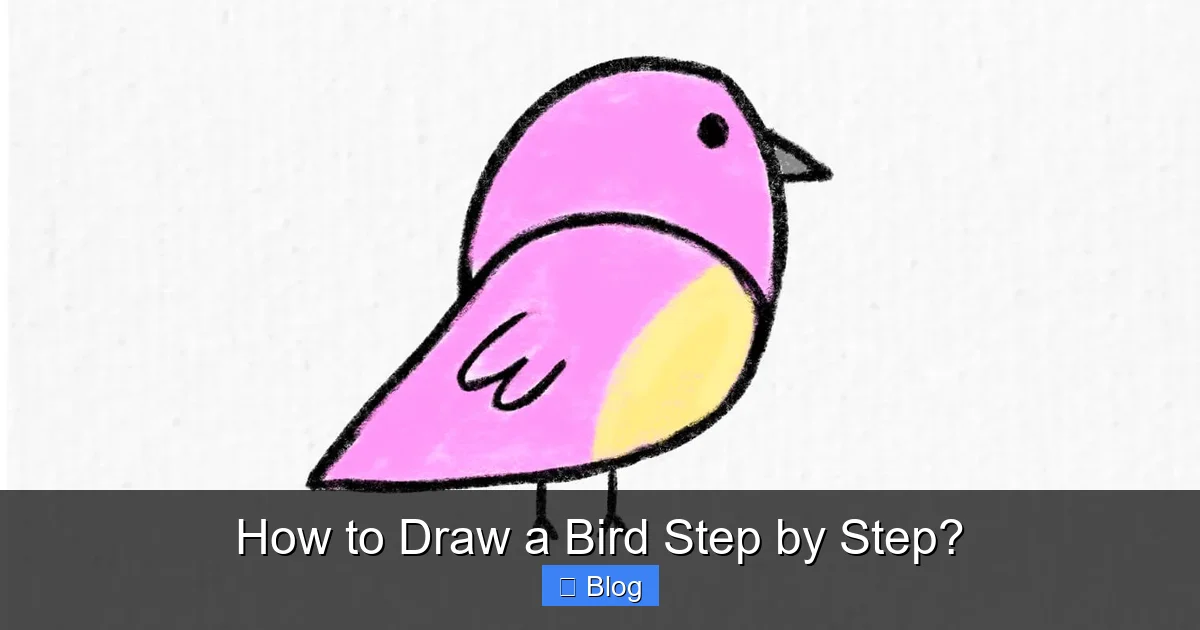
- Body Feathers: These are generally smooth and overlap like scales. Use short, soft strokes in the direction the feathers grow to suggest this texture.
- Wing and Tail Feathers: These are longer and more defined. Draw individual, overlapping shapes for the primary (outer) and secondary (inner) flight feathers on the wings and the longer tail feathers. Think of them as individual leaves on a branch.
- Head Feathers: Often very fine. Use tiny, soft strokes or dots to suggest a soft, downy texture.
Pay attention to the natural flow and direction of the feathers. They aren’t random; they grow in specific patterns to aid flight and insulation. This detailing stage is crucial for mastering how to draw a bird step by step realistically.
Adding Subtle Shading and Highlights
Shading gives your bird dimension and makes it pop off the page. Use your softer pencils (2B, 4B) for this. Think about where the light source is coming from.
- Shadows: Areas beneath the wings, under the belly, and on the side of the bird away from the light source will be darker. Build up these shadows gradually with light, overlapping strokes.
- Highlights: The brightest areas, where the light directly hits, should be left lighter or gently erased if you’ve already shaded them. A small, well-placed highlight on the eye can make it sparkle.
- Value Range: Use a range of values from light to dark to create depth. Don’t be afraid to go dark in some areas; this contrast will make your drawing more dynamic.
Considering the Environment
Even a simple branch or a hint of foliage can help ground your bird and tell a story. A branch beneath its feet or a distant tree line can add context and interest to your drawing. You don’t need to draw an elaborate background, but a few suggestive lines can make a big difference. This step is about integrating your bird into its world, making your complete picture more cohesive.
Tips for Improvement and Ongoing Practice
Drawing is a journey, not a destination. To truly excel at how to draw a bird step by step, consistent practice and an open mind are your best assets.
Draw from Reference (Photos, Real Birds)
Never stop using references! Even professional artists rely heavily on them. High-quality photographs help you observe details you might otherwise miss. If you have the opportunity, observe real birds in your backyard or at a park. Notice their typical postures, how they move, and the way light plays on their feathers. The more you observe, the better your drawings will become.
Experiment with Different Bird Species
Don’t just stick to one type of bird. Challenge yourself! Try drawing a tiny hummingbird, then a majestic eagle, a plump robin, or an elegant heron. Each species presents unique anatomical challenges and will teach you something new. This variation will broaden your skills and understanding of avian forms, making you more versatile in how to draw a bird step by step.
Don’t Be Afraid to Make Mistakes
Every artist makes mistakes. It’s how we learn! Don’t view a “bad” drawing as a failure, but as a stepping stone. It tells you what you need to practice more. Keep all your drawings, even the ones you don’t like as much. Over time, you’ll be able to look back and see the incredible progress you’ve made. The act of drawing itself is valuable, regardless of the outcome of a single piece.
Remember, the goal is not immediate perfection but continuous improvement. Enjoy the process of learning and creating. Each time you pick up your pencil and practice how to draw a bird step by step, you’re becoming a better artist.
Conclusion
Congratulations! You’ve just walked through the complete journey of how to draw a bird step by step. From laying down those initial light shapes to adding the intricate textures of feathers, you now have a solid framework for creating your own avian artwork. We started with understanding basic tools and the importance of observation, moved through breaking down complex forms into simple shapes, and then painstakingly built up our bird with wings, tails, legs, and expressive facial features. Finally, we learned to bring it all to life with subtle shading and thoughtful details.
The true magic of drawing birds lies in the blend of observation and imagination. Every stroke you make is a reflection of what you see and how you interpret it. Don’t underestimate the power of consistent practice. The more you draw, the more intuitive the process will become, and the more confident you’ll feel in your abilities. Remember to use references, experiment with different bird species, and most importantly, enjoy every moment of your creative process.
So, keep those pencils sharp and your sketchbook handy. The world of birds is vast and full of inspiration, just waiting for you to capture its beauty. Keep practicing how to draw a bird step by step, and soon you’ll be creating stunning avian illustrations that truly take flight off the page. Happy drawing!
Frequently Asked Questions
Is it okay to trace initially when learning how to draw a bird step by step?
Yes, tracing can be a helpful learning tool for beginners. It helps you understand the correct proportions and contours of a bird without the pressure of freehand drawing. Just be sure to also practice freehand drawing from references to truly develop your observational skills.
How important is perspective when drawing birds?
Perspective is very important, even for simple bird drawings. It helps convey depth and realism. Pay attention to how the bird’s form foreshortens when viewed at different angles, making sure distant parts appear smaller and closer parts larger.
What’s the best way to practice drawing birds regularly?
The best way is to set aside dedicated time each day or week, even if it’s just 15-20 minutes. Keep a sketchbook handy and draw from different reference photos or observations. Focus on one aspect at a time, like just drawing heads or wings, to build specific skills.
Can I draw birds from memory, or should I always use a reference?
While drawing from memory is a great way to test your understanding, it’s always best to start and often continue with a reference. References provide accuracy and details that are hard to recall perfectly. As you gain experience, you’ll be able to draw more confidently from memory, but references remain invaluable.
Are there common mistakes beginners make when drawing birds?
Yes, common mistakes include making the head too large or small, drawing stiff or blocky shapes instead of flowing curves, neglecting basic proportions, and trying to draw every feather too early. Focusing on light initial sketches and building up gradually helps avoid these.
How can I add color to my bird drawings after I’ve drawn the outline?
Once your pencil drawing is complete, you can add color using various mediums like colored pencils, watercolors, or acrylics. Start with light layers, building up color gradually. Pay attention to the bird’s actual feather colors and patterns in your reference to ensure accuracy.